The
three windshield pieces I had to work with when I was doing restorations
of three original AMT '60 Ford convertibles were all damaged.
(Click
here for the full article.)
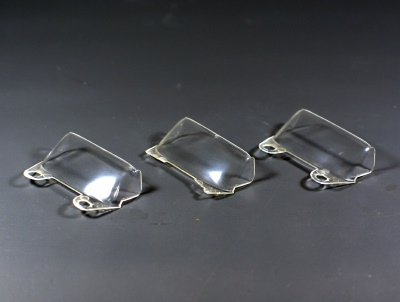
The
three windshield pieces I had to work with when I was doing restorations
of three original AMT '60 Ford convertibles were all damaged.
(Click
here for the full article.) |
 No. 1 had some
serious glue damage in three places.
No. 1 had some
serious glue damage in three places. |
 No.
2 had glue damage, scratches and old paint in both vent window
areas.
No.
2 had glue damage, scratches and old paint in both vent window
areas. |
 No.
3 also had scratches and a deep pitted area where a drop of glue
had been dropped on the surface and then wiped away.
No.
3 also had scratches and a deep pitted area where a drop of glue
had been dropped on the surface and then wiped away. |
 You'll
need a variety of tools for this project, including some sanding
sticks. This is a set I got from Micro Mark.
You'll
need a variety of tools for this project, including some sanding
sticks. This is a set I got from Micro Mark. |
 I
also used Flex-i-file Flex Pads in various grits, from medium
to extra fine, plus their very handy polishing stick.
I
also used Flex-i-file Flex Pads in various grits, from medium
to extra fine, plus their very handy polishing stick. |
 You can also
find sanding sticks in various grits in the cosmetics section
of most department stores. These are a bit wider than the tools
mentioned above, and are handy for covering broader areas.
You can also
find sanding sticks in various grits in the cosmetics section
of most department stores. These are a bit wider than the tools
mentioned above, and are handy for covering broader areas.
|
 Assorted fine
grit sanding sheets are also handy for working with curved areas.
Assorted fine
grit sanding sheets are also handy for working with curved areas.
|
 For the final
finishing and polishing, you can't so better than the Novus polishing
system; in order of use: No. 3 Heavy Scratch Remover, No. 2 Fine
Scratch Remover, and No. 1 Plastic Clean & Shine.
For the final
finishing and polishing, you can't so better than the Novus polishing
system; in order of use: No. 3 Heavy Scratch Remover, No. 2 Fine
Scratch Remover, and No. 1 Plastic Clean & Shine. |
 The severity
of the damage will determine the coarseness of the grit you should
start with. A general rule is to use the finest grit you can use
and still get the job done. In the case of these particular windshields,
because of the heavy glue damage I started with a medium grit
stick. If you're tackling light scratches you may find that you
can skip all the way down to using just the Novus products.
The severity
of the damage will determine the coarseness of the grit you should
start with. A general rule is to use the finest grit you can use
and still get the job done. In the case of these particular windshields,
because of the heavy glue damage I started with a medium grit
stick. If you're tackling light scratches you may find that you
can skip all the way down to using just the Novus products.
|

Here you can
see some of the preliminary sanding on No. 1. In the case of heavy
glue damage, there'll be a white spot in the damaged area. You'll
need to continue to carefully sand until the white area disappears. |
|
 Here you see
the preliminary sanding finished on all three pieces. The initial
sanding will cause a lot of scuffing and scarring of the clear
plastic. Don't worry about this; we'll clear things up in later
steps. Here you see
the preliminary sanding finished on all three pieces. The initial
sanding will cause a lot of scuffing and scarring of the clear
plastic. Don't worry about this; we'll clear things up in later
steps. |
|
 After
the initial sanding step, I changed to a finer grit stick and
started sanding out broader areas to smooth out some of the rougher
areas. The key to success is to work slowly through a successive
series of ever finer grits. After
the initial sanding step, I changed to a finer grit stick and
started sanding out broader areas to smooth out some of the rougher
areas. The key to success is to work slowly through a successive
series of ever finer grits. |
|

Here's the
result after sanding all three windshields with an even finer
grit sanding stick than was used in the previous step. As you
continue to work, you'll see the transparency slowly start to
return. |
|

Additional
sanding with the finest grit sanding stick I had available resulted
in even greater transparency. Extra fine sanding sheets also work
well at this stage. You may find you'll want to use several different
tools throughout the project, sanding sticks, sanding sheets,
etc., depending on the shape of the area you're working on. |
|

After
all the sanding is done, it's time to switch over to the Novus
polishing system. Start with the No. 3 Heavy Scratch Remover,
and following the instructions on the bottle, start polishing
both surfaces. |
|

As
you continue to polish with the Novus No. 3 you'll notice a dramatic
increase in the clarity of the piece. |
|

Once
you've gotten things pretty well smoothed out, switch to Novus
No. 2 Fine Scratch Remover for the final polishing. Again, follow
the bottle's instructions. |
|

You can also
use a fingernail buffing stick to do a final clean up fine scratches. |
|

The last step
is to do a final polishing with Novus No. 1 Plastic Clean &
Shine. |
|
And here's
the finished product. All that sanding and buffing pays off! |
|
|